CLICK HERE FOR FREE BLOG LAYOUTS, LINK BUTTONS AND MORE! »
Showing posts with label picture coasters. Show all posts

Saturday, April 28, 2012

Sew Its Saturday: 10 DIY Mother's Day Gifts She's Sure to Love


Can you believe Mother’s Day is coming up in just 3 short weeks?? I can’t believe it’s almost May, let alone Mother’s Day!! And, if you’re like me, you have thought of a million and one different gifts to give your sweet momma. Yet you have nothing to give her!

Yep…I always have great intentions and lofty goals of these wonderfully elaborate gifts that don’t ever seem to come to fruition. So, this year I’m starting a little early…okay, earlier than I usually do anyway!

I am a big believer in homemade gifts for those we love; especially parents and grandparents. If you’re like me, you have enough knick-knacks around and you don’t want anything else to dust! And the time and care that goes into those homemade gifts is just priceless!!

Mom’s love their “job” but at the end of the day, let’s face it…it’s nice to be pampered. 

So, here are 10 DIY Mother’s Day gifts that do just that – show her how much you love and appreciate her!

1. Mini Scrapbook Album – I made these a few years back for the grandma’s and great-grandma’s in our family. They were a huge hit! Some of them even carried them around for months to show off their precious heirlooms!! Mine were paper album kits from Creative Memories, much like this one for Mom or this one for Grandma. Add a few fun photos of your sweet kiddos, some sentimental words (or funny ones if you like) and presto…you’re done!

2.  Handprint/Footprint canvas – I actually made these for Christmas for all the grandparents and greats. But, you could change it up a bit and do handprints as flowers for a bouquet for Mom or footprints as butterflies. Or come up with a design all your own! Let the kids help and who knows what you’ll come up with! Be creative and mom’s sure to love it!!
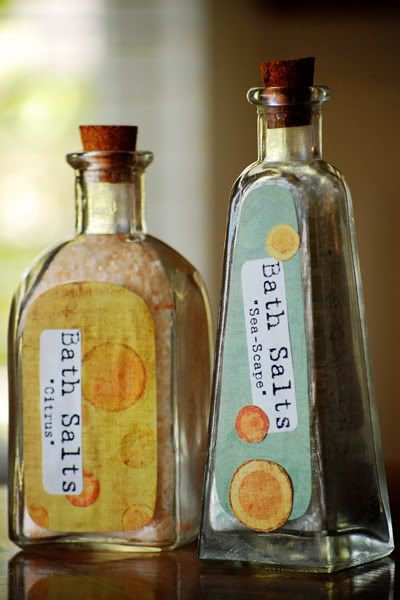
3.  Homemade Sugar Scrubs and Bath Salts – Purchase this ebook and make Mom some homemade sugar scrubs!! Purchase an extra copy and give the recipes to her so she can make her own! Or use this simple and quick recipe to make Mom some scented bath salts.

4. Homemade Lip Balm – Now, I’m not one to wear lipstick, but I love my chapstick. But, I would love to have some homemade lip balm!! This blog gives 3 recipes (Mandarin Nutmeg, Peppermint Cocoa & Lime Coconut) but at the end it gives some tips on creating your own recipes!
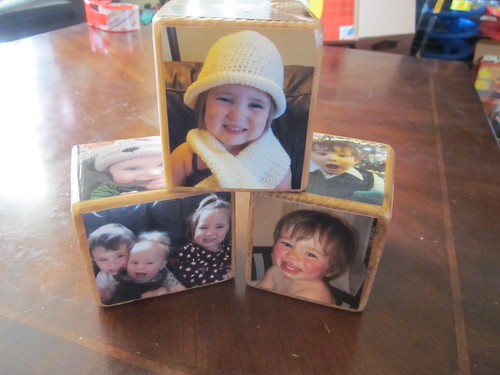
5. Photo Cubes – Another quick and easy gift for Mom or Grandma. This blog post gives great instructions on how to create your own Photo Cubes. Use scrapbook paper to back smaller photographs or just to dress it up a bit! Get creative and just go for it!

6. Photo Tile – I saw this tile sometime last year and knew I could make those for the grandparents and greats for Christmas. But, it would also work for Mother’s Day!! Take the kids out for a fun afternoon (or morning, when its cooler) of candid picture taking and make some tiles for Mother’s Day! Dress it up with some scrapbook paper and a few 3D embellishments and you’ll be set!

7.  Homemade Glass Pendants – I made some of these for the girls in my family this past Christmas. These two blogs (here and here) have some great ideas on different pendant ideas. They are super easy to make and most craft stores will have what you need!! Again, take the kids out for some candid pictures, pick our your favorite and you’re ready!

8. Sweet Hanging SachetsSew 4 Home has a great tutorial on how to make these uber cute hanging sachets!! Hang it on a decorative hanger and you’re good to go!!

9. DIY Painted Canvas Tote – Ashley is so talented and she’s done it again! She has a super easy to follow tutorial on how she created this divine tote. You could paint her favorite flowers in her favorite color or…put the kids’ handprints on it for a more personal touch that she’s sure to love! Slip in a couple books she likes or a “chick-flick” she’s had her eye on. Or better yet…get her a gift certificate for a pedicure, massage or another special “treat”!!!
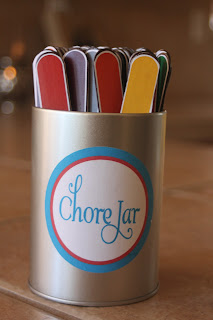
 My inspiration for the Mom’s Day OFF Jar

10. Mom’s Day OFF Jar –Give Mom a “day off” by pulling out a slip of paper and doing what it says. Have the kids help decorate the jar on the outside and then put paper flowers, colored by the kids, attach them to pipe cleaners and you’ve got a homemade kid-bouquet! You’ll have to forgive me for not having one of these to show you. (I’m secretly hoping the Hubster will give me one of these this year!) Feel free to download, print and use my Free Printable here. To use my printable, cut the Mom’s Day OFF button out and adhere to a jar/can with Mod Podge. Then, cut apart the strips of chores and fold them in half and stick them in the jar/can. I also left some blank strips so you can fill in your own ideas. Add your own homemade flowers and voila…Mom gets a “Day OFF” and a bouquet from her favorite little people!


Hope that gives you some quick and easy ideas for Mother’s Day. There are certainly many more ideas out there these were just some of my favorites!

What’s your favorite Mother’s Day gift?? How do you celebrate Mother’s Day?

Please share your thoughts and ideas in the comments or leave a link to your own post! I love reading them and its keeps my creative juices flowing!!

Blessings,

Sunday, January 15, 2012

DIY Photo Coasters


I’m so excited to share this DIY project with you all!!! I saw the idea here on Pinterest (of course) first and just knew it was a perfect fit for the grandparents & great-grands in our family! (Have I mentioned my obsession with Pinterest?) I know it seems pretty straight forward, but there are some tips I’d like to share with you. And some pictures too!

First, gather your supplies: (pic above)
* 4x4 Tiles ($4.98/9 @ Lowe’s)
I chose Travertine ones from Lowe’s. You can use 
ceramic or whatever. I just liked the color of these!
* Mod Podge (you can use either gloss or matte)
* Felt Pads (or rubber ones, which is what I will use next time – more on that later)
* 4x4 printed picture(s)
* Foam brush
* Photo Trimmer (you can use scissors, but the trimmer makes it so much easier)

**Insert 3-hour heart-attack delay here. We had to rush my 35m son to the ER because he was having trouble breathing! Yes, he is doing better. Yes, we are back home. He has severe RSV with possible asthmatic wheezing. Oh.JOY! (insert completely sarcastic voice) This incident is why the post didn't go up yesterday, so sorry to those of you (all 2 of you) waiting on a DIY post!

Okay, back to our DIY project! (I need to decompress and blogging is the perfect solution!)


After you’ve gathered your supplies, you’ll want to make sure you have a clear space to not only apply the Mod Podge to your tiles, but also a place to lie them flat for drying. So, here we go:

Step 1: Paint the back side of your tile with a generous coat of Mod Podge. I used the matte for this step since it wouldn’t be seen. If you have to buy Mod Podge, I recommend buying the Gloss-Lustre since you’re going to put it over the photos too. Or try making your own using this recipe – I’ve not tried yet, but will as soon as my supply runs out. (Sorry I don’t have a picture of this step.)  Why are you coating the back side? Well, I found with my travertine tiles that the “dust” was coming off when they were handled. So, just a simple coat of Mod Podge will seal all that “dust” in!!


Step 2: Take your 4x4 pictures and your photo trimmer. We’re actually going to trim them down so they will have a small border of tile for the Mod Podge to really adhere to. Plus, I think it looks better with a border rather than just a full picture tile (at least for this project).  Start by lining your picture up ½ way between the 4” and 3 ¾” mark (view 1).


This will trim off about 1/8” each side and shrinking the picture about ¼” on the top & side. (view 2)

If you do enough pictures, you’ll have a nice little pile like this one! (Not sure why I took this picture, but I guess it was important so I should include it.)

Step 3: Center the picture on your tile (pic) to make sure you know where you’re going to place it once the Mod Podge is on and to make sure you've trimmed it evenly. (This may be an extra and anal step, but I'd rather be safe than sorry!)

Step 4: Coat top side of tile with Mod Podge going in one direction. So, if you’re stroking down, continue stroking down all the way across the tile. Then, you can go the opposite direction to ensure you’ve coated it completely.

Step 5: Carefully place picture onto coated tile. And set aside to dry. Approx 15 minutes. If you’re doing multiple coasters, you can probably do an assembly line and by the time you’re done placing the pictures on you can go back to the first tile & move on to Step 6.

Step 6: FIRST make sure your picture is really stuck down good. (Now how hick did that sound? Even typing it I hear this nice, sweet hick voice – obviously not mine, but one I’d like to have!) Once you know its ‘secure’ you can begin the first of two top coats. I always start with the downward stroke, so that’s what we’ll say – Start with the downward stroke & continue across the entire tile. This coating is very thin & just enough to cover the picture (see photo). DO NOT OVER COAT or your picture will wrinkle & bubble. Also, try to make your lines as straight as possible, as it will enhance the overall effect of the finished product. Set aside & continue on down the assembly line. Let them dry at least 30 minutes this time.

Step 7: AGAIN, make sure the last coating is dry before moving on. Once you know it’s dry, you’re going to do another thin coat of Mod Podge – only this time you’re going to go from side to side. (see photo – this is my husband finishing up for me AND taking a picture!! Isn’t he the GREATEST?!) I usually turn the tile so I’m stroking up & down again, only the picture is turned. That’s just the way my brain works, but apparently the hubster’s brain is far more advanced & he can do it this way! WOW!!! Aren’t you ladies jealous now?!

Now, I left them overnight to dry at this point. I wanted to make sure they were completely dry before packing them up for gifts.


This is what your final product should look like up close. A nice linen-type look. Isn't it beautiful? Of course, the cutie-patootie little girl with her tongue sticking out makes them just that much cuter, right?! I love that girl! And yes...her tongue is out pretty much all the time!


(Above) I tried to make a "random" picture, but it just looks like I don't care or can't lay out tiles correctly. Either way it was driving me NUTS, so I straightened them up (like I said, I'm a little anal) and took another picture. This time, much more evenly spaced and straight! (below)

Yep!! That looks so much better, doesn't it?

Now, I left them overnight to dry at this point. I wanted to make sure they were completely dry before packing them up for gifts.

Step 8: Adhere the felt (or rubber) pads on the bottom 4 corners. (no picture, sorry)


TIP: If you use the felt pads, make absolutely sure the Mod Podge is COMPLETELY dry before you stack them. My felt pads stuck to the Mod Podge. See where there are smudges in the bottom corners? Yep, that's from the felt sticking to the pictures. I think I can fix them with another coat of Mod Podge, but I honestly haven't tried yet. (I'll be sure and post how that turns out.)

NOTE: Given the choice, I would go with the rubber feet. They shouldn’t stick to the Mod Podge and they would not slide around on the furniture either. WIN-WIN!!

Now, sit back & admire your handiwork!!!!

Let me know if you try these fun and easy photo coasters!

Blessings,
Annette