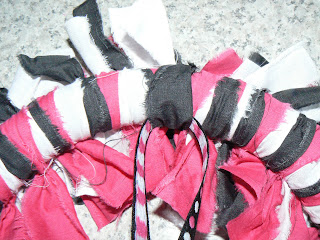
What do you get a 9 yr
old for her birthday? The other day my niece turned 9 and I had no idea what to
get her. I started looking a couple weeks ago for ideas…yes, on Pinterest, of course!! I came across this
SUPER CUTE idea and thought…Wouldn’t
Z love this?? So, before I embarked on the DIY journey, I consulted with her
mother for approval. (Nothing would be worse than making something they would hate
or already have! UGH!!) After getting said approval, I set out for the supplies.
So, I actually took pictures of the process and I’m ready to share this GREAT
tutorial with you!!! It’s super easy, just a little time-consuming. ENJOY!!!
What you’ll need:
Foam wreath (the one you see above is not the one I used. I’ll explain later)
Lightweight Cotton Material (2+ different colors, patterns-I used 3 colors & got 1/2yd each with plenty left over)
Scissors
Wired ribbon
Florist wire or bow tying wire
Wire cutters
Pliers
Mod Podge
Foam brush (small size – not the one pictured here)
Scrapbook paper
Wood Letter (I’ll leave the size up to you, mine is about 4” tall)
Hot Glue gun
Decorative ribbon (to tie the letter on with)
Step 1: You’ll want to straighten up the cut edges by either trimming them (if you can cut a straight line, which I cannot) or tearing a small strip just to even it up. We cut about ½ inch in to get ours straight.
 |
| You’re strips will look like this. You may want to go ahead and cut the straggling threads. |
Step 3: Fold the long strip in half and then half again, so it looks like this (above). Then, cut along the folded edges. This will give you 4 strips about 11” in length. If you want longer strips after you tie them, fold it in thirds and you should have strips about 15” in length.
Once you’ve cut all your strips, they should look like this! Aren’t they pretty?!
Okay, so…here’s when we realized the Styrofoam wreath I bought was a little too large for my strips. And, yes…I measured before I cut them, but apparently I’m not really good at that either! LOL
Step 4: If you’re going to use the foam pipe covering, you’ll want to measure out how large of a circle you want. Then, cut it the right length. Next, you’ll peel the paper off one side and roll it into itself. Then, peel the other side and roll it around. (Sorry, I don’t have a picture of this step. The Hubster was helping and did this step before I could grab the camera!) Once you’ve rolled it, you’ll want to duct tape the ends together to form your wreath. Now, like I said…the Hubster helped and so he thought the ring needed some reinforcement, so he also duct taped the edges that he rolled together. (I think he just likes using duct tape!) Later…this proved to be a smart move! It really helped having it rolled up tight as I tied on the fabric.
Step 5: Now you’re ready to begin tying!!! First, you’ll need to figure out what order you want the fabric to go in or if it’s just random. Then, start at the top (where the two edges are duct taped or where the Styrofoam is pieced together) and tie each strip in a double knot Be sure to stagger the knots so you can get them closer together, which is what gives the wreaths their fullness.
 |
| Half way there and starting to take shape!! I’m loving it!!!! |
 |
| Finished tying!! This takes a good 30-40 minutes (Unless you’re constantly getting up for a crying baby. Then, it takes you about an hour!) |
 |
| Step 6: Now it’s time to get our letter ready. First, you’ll take your letter and lay it on the backside of the scrapbook paper. Make sure your letter is reversed!! |
 |
| Step 7: Trace the letter. TIP: When tracing, keep your pencil at an angle so you get as close to the edge as possible. |
 |
| Step 8: Cut out the letter. (I know that's obvious, but thought I should put it in there just in case you're doing this at midnight like I was and you're apt to forget a step or two.) |
 |
| Isn’t it pretty?! |
Step 9: Put a thin layer of Mod Podge on your letter. And carefully place the cut-out letter on the wood one. Line it up quickly before the Mod Podge starts drying.
And, if yours doesn’t line up (like mine didn’t), you can use a sharpie (like I did) and color the edges to cover it up.
Step 10: After that dries really well (about 5 minutes or so), you will want to put another thin layer of Mod Podge on top of the scrapbook paper. That way it’s protected and gives it a nice sheen! See?! Let that dry about 10 minutes before you move on to the next step.
Step 11: Now, it’s time to hang your letter. So, loosen the last strip you tied and slip a piece of coordinating ribbon through it.
Step 12: Measure how long the ribbon needs to be in conjunction with where you want the letter to hang. Now, cut the ribbon the correct length. Once you’ve cut the ribbon, hot glue it to the back of your letter.
 |
| Oooohhhh…I’m LOVING this!!! Aren’t you?! |
 |
| Here’s a close up of the letter hanging in the wreath. SO CUTE!!!!! |
Step 13: Make the BIG bow for the top! I followed this tutorial to make my bow, but only made one layer instead of two. (Actually, I made two layers, but decided against the second layer thinking it looked too busy.)
Step 14: Once you’ve made
the bow you’ll need to attach it. Now, I didn’t have floral wire or bow tying
wire, so I just used an extra piece of torn material (in fuschia, so it matched
the ribbon) to attach my bow. I looped the material through the backside of my
bow and just tied it around the wreath. After I tied a double knot, I cut the
ends pretty short. Then, I hot glued them down, just so they would stay.
All done!!! What do ya
think? It’s pretty stinkin’ cute, right? Do ya think a 9yr old will like
it?! I sure hope so!!!!
I can think of a TON of reasons to make these::
Holidays (4th
of July, Christmas, Thanksgiving, Easter)
Seasons
To match the kids’ rooms
Baby gifts
Wedding gifts
And, I'm sure there's more I'm missing!!!!
You could make them large
or small too!!! Oooohhh…these are
gonna be EVERYWHERE!!!!
Get creative and get busy!!! Happy Crafting!!
Blessings,


No comments:
Post a Comment